-
[포스코x코딩온]SpringBoot의 시작(설치부터 Thymeleaf사용까지)[포스코x코딩온] 웹개발자 풀스택 부트캠프8기 2023. 10. 28. 13:50728x90
Spring

- Java 기반의 웹 어플리케이션을 만들 수 있는 백엔드 프레임워크
- Java로 다양한 어플리케이션을 만들기 위한 프로그래밍 툴
- https://spring.io/
Spring | Home
Cloud Your code, any cloud—we’ve got you covered. Connect and scale your services, whatever your platform.
spring.io
Spring Architecture
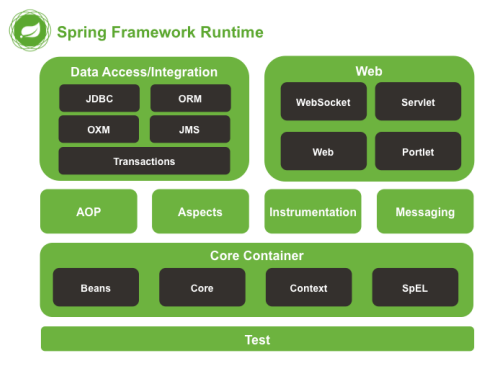
특징
- IoC(Inversion of Control, 제어 반전)
- 객체의 생성부터 소멸까지 개발자가 직접 하는 것이 아닌 Spring Container가 대신해 주는 것
- 제어권이 개발자가 아닌 IoC에 있으며, IoC가 개발자의 코드를 호출해 필요한 객체를 생성, 소멸해 생명주기를 관리한다.
- Apple 객체의 제어권이 Sample에 있는 것이 아니라, SampleTest에게 있다.
- 의존성을 역전시켜 제어권을 직접 갖지 않는다.
class Sample{
	private Apple apple;

	public Sample(Apple apple){
		this.apple = apple;
	}
}
class SampleTest{
	Apple apple = new Apple();
	Sample sample = new Sample(apple);
}
- DI ( Dependency Injection, 의존성 주입)
- 구성 요소의 의존 관계가 소스코드 내부가 아닌 외부의 설정 파일을 통해 정의되는 것
- DI를 통해서 IoC를 이룬다.
- 이를 통해 코드 간의 재사용률을 높이고, 모듈 간의 결합도를 낮출 수 있다.
- 방법
//Field Injection(필드 주입)

@Autowired
private FieldService fieldService;

//Setter Injection(수정자 주입)

private SetterService setterService;

@Autowired
public void setSetterService(SetterService setterService){
	this.setterService = setterService;
}

//Constructor Injection(생성자 주입)

private final ConstructorService constructorService;

@Autowired
public ExampleComponent(ConstructorService constructorService){
	this.constructorService = constructorService;
}
- AOP(Aspect Object Programming, 관점 지향 프로그래밍)
- 어떤 로직을 기준으로 핵심적인 관점, 부가적인 관점으로 나누어서 보고 그 관점을 기준으로 각각 모듈화하겠다는 것
- 기능을 비즈니스 로직과 공통 모듈로 구분한 후, 개발자의 코드 밖에서 필요한 시점에서 비즈니스 로직을 삽입하여 실행되도록 한다.
- AOP는 공통관심을 따로 빼내어 객체별로 처리하는 것이 아닌 관점별로 외부에서 접근해 사용하도록 만든다.
- POJO(Plain Old Java Object, 단순한 자바 오브젝트)
- 객체 지향적인 원리에 충실하면서 환경과 기술에 종속되지 않고 필요에 따라 재활용될 수 있는 방식으로 설계된 오브젝트
- getter, setter 같이 기본적인 기능만 가진 Java 오브젝트
class Person{
	private String name;
    public String getName(){
    	return name;
    };
    public void setName(String name){
    	this.name = name;
    }
}
Spring Boot

- Spring을 더 쉽게 이용하기 위한 도구
- Spring을 이용할 시, 필요한 여러 가지 세팅 작업들(ex, 톰캣 서버 설정, XML 설정 등) 없이 쉽고 빠르게 프레임워크를 사용할 수 있도록 만들어진 것
- https://spring.io/projects/spring-boot
Spring Boot
spring.io
Spring Boot를 사용하기 위한 IntelliJ를 설치해 준다.
Spring Boot 시작하기
- https://start.spring.io/
- Spring Boot 기반으로 Spring 관련 프로젝트를 만들어주는 사이트
- Spring에서 운영하고 있으며, 해당 사이트에서 프로젝트 시작을 많이 한다.
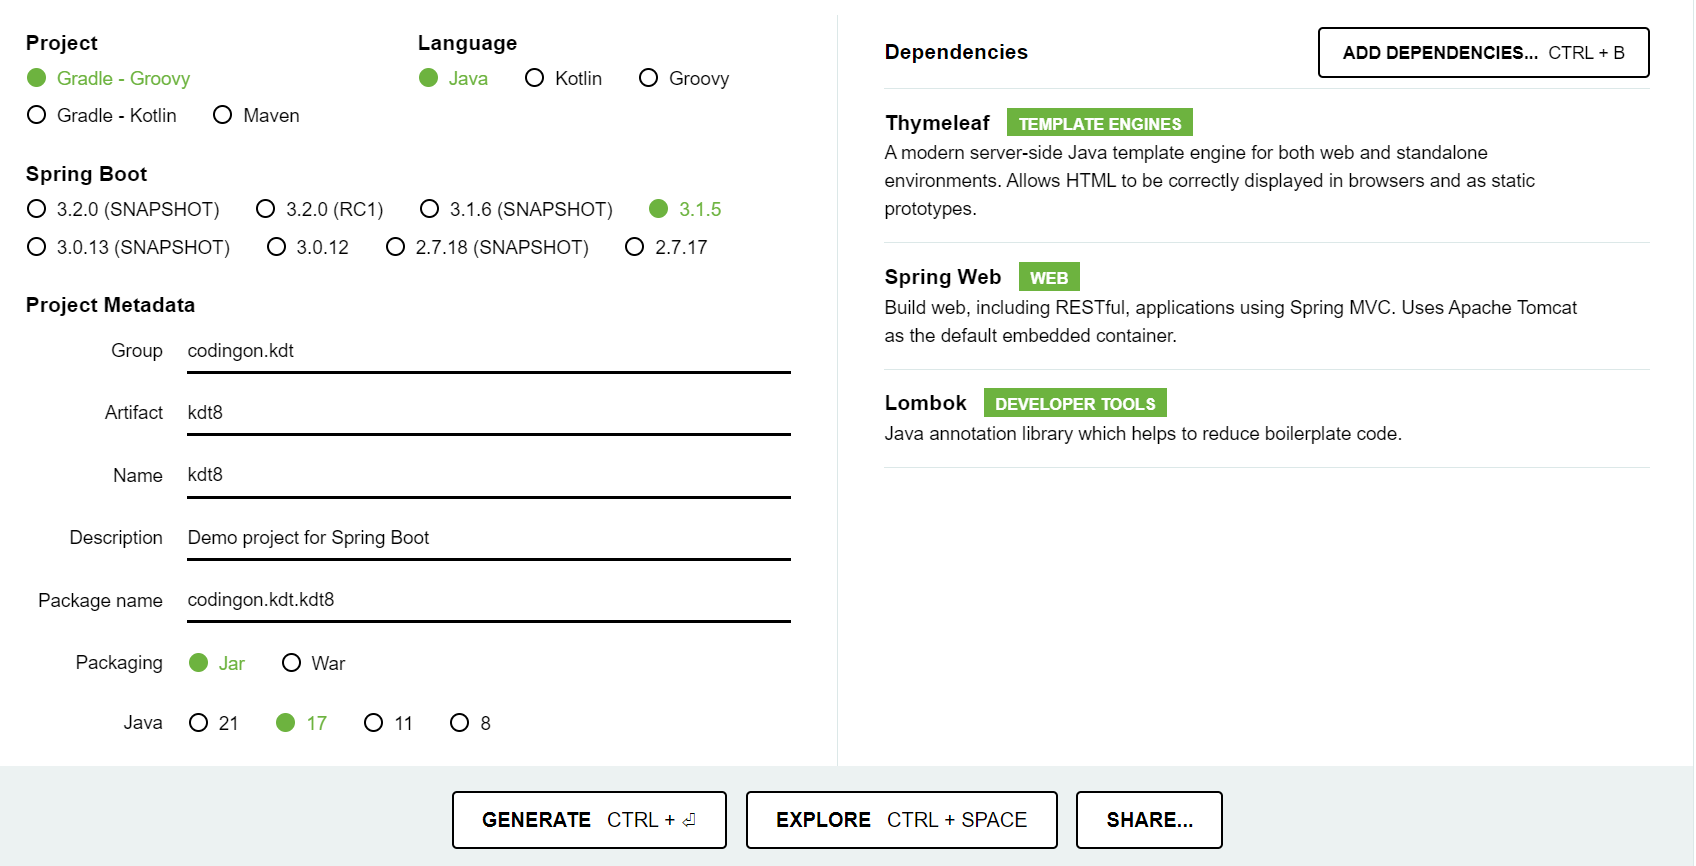
- Group: 패키지 앞부분, example을 적으면 개발 중으로 배포불가능. 일반적으로 회사명이나, 소속기간을 적음
- Artifact: 만드는 이름
※ Thymeleaf을 사용할거라 의존성에 넣어준다.
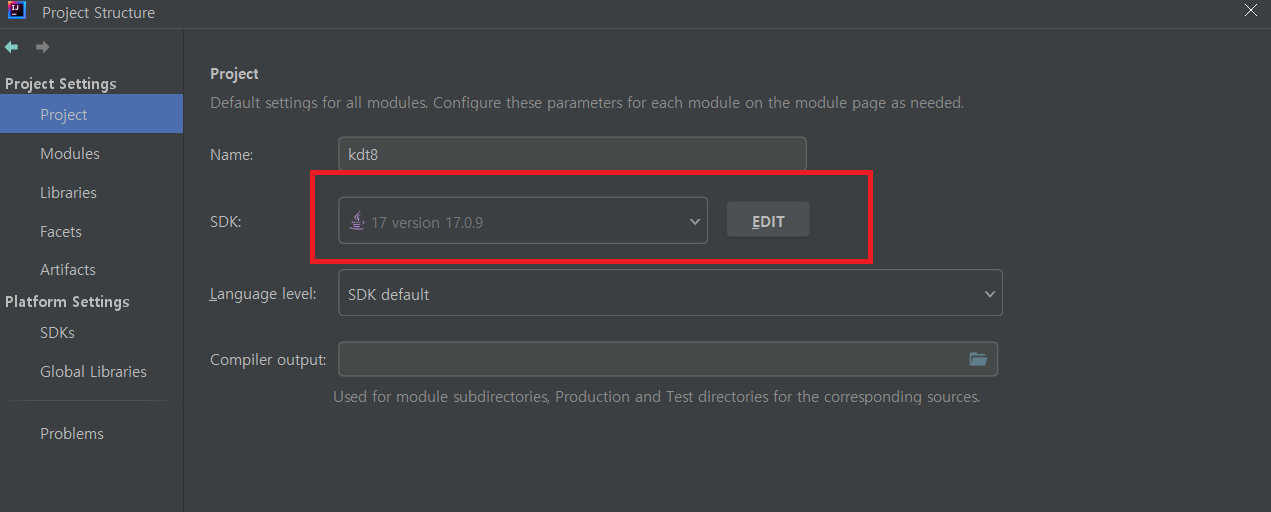
- Generate 해서 다운로드한 파일을 압축 해제 해주고 Intellij에서 파일을 열어준다.
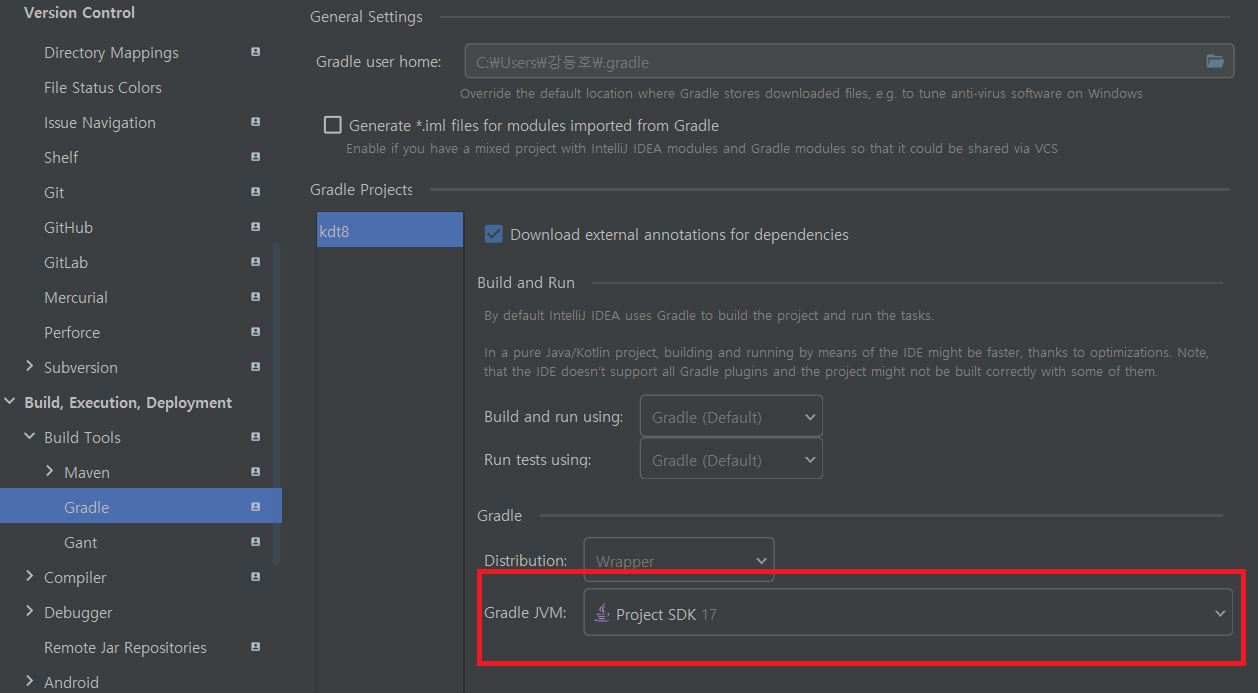
※ Java 버전 17로 맞춰야 한다. 버전 맞추는 방법
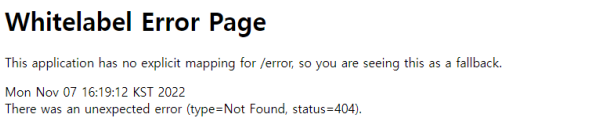
실행해보기
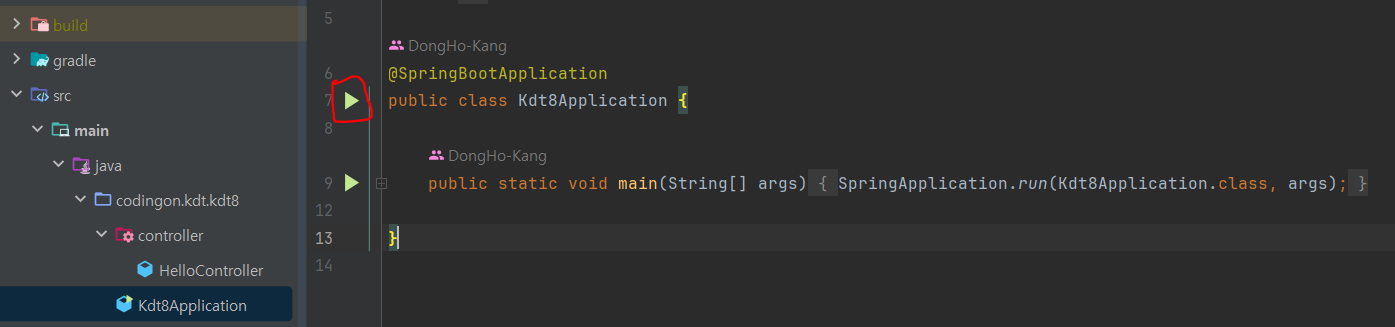
- 8080포트로 열린다.(localhost:8080)
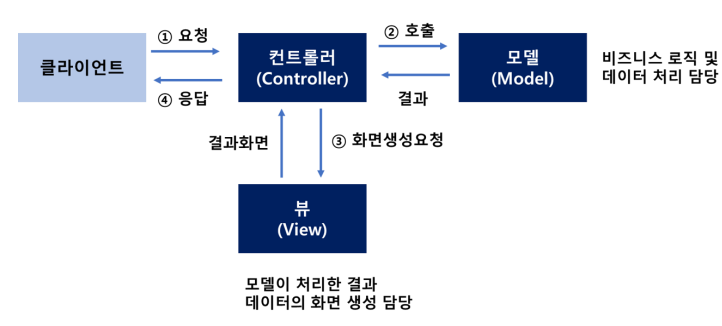
Spring MVC
- 파일 구조 (여기서는 poeple는 신경 안 써도 된다.)
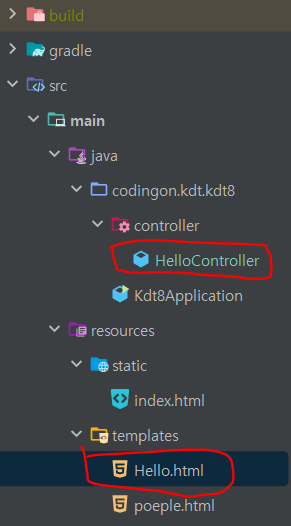
- HelloController.java
- return하는 글자로 된 파일을 templages에서 먼저 찾는다. 그 뒤에 static에서 찾는다.
- @getMapping을 통해 URL 요청을 받는다.
- URL을 매핑시켜 주는 것으로 getmethod로 해당 경로로 들어올 시 getHello라는 함수를 실행시킨다.
- @Controller
- 해당 클래스가 Controller 클래스라는 것을 Spring Container에게 알려준다.
@Controller public class HelloController { @GetMapping("/") public String getHello(Model model){ return "hello"; } //컨트롤러에서 리턴에 글자를 입력하면 파일명을 찾게 된다. //즉, getmapping으로 URL 주소가 들어왔을 때 return에 있는 글자를 templates에 있는 파일에서 찾아서 불러온다. //읽어오는 우선순위: templates => static 순으로 읽어온다. (return된 글자명의 파일을 찾는 순서) @GetMapping("/hello") public String getHello2(){ return "hello"; }- Hello.html
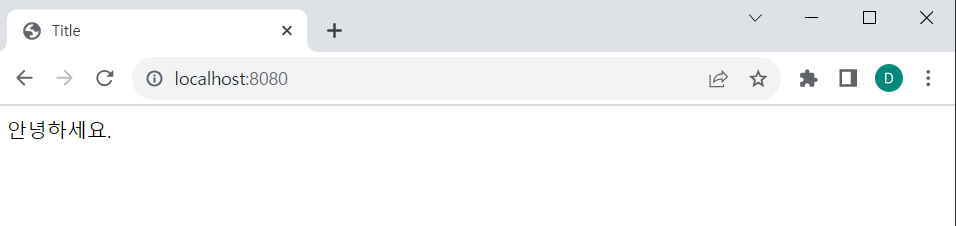
<!DOCTYPE html> <html lang="en"> <head> <meta charset="UTF-8"> <title>Title</title> </head> <body> 안녕하세요. </body> </html>- 실행 결과
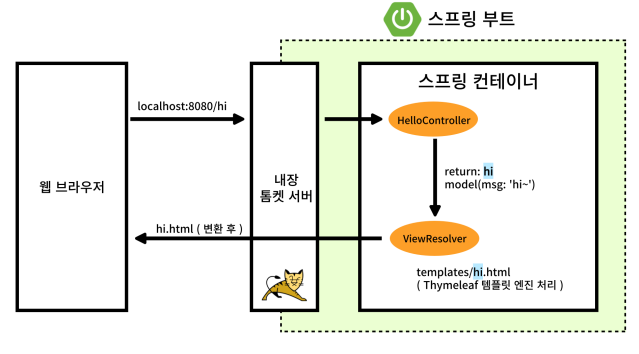
Thymeleaf 템플릿

- 템플릿 엔진의 일종으로, html 태그에 속성을 추가해 페이지에 동적으로 값을 추가하거나 처리할 수 있게 도와주는 것
- Spring Boot 사용 시 권장되는 템플릿 엔진
- https://www.thymeleaf.org/
Thymeleaf
Integrations galore Eclipse, IntelliJ IDEA, Spring, Play, even the up-and-coming Model-View-Controller API for Java EE 8. Write Thymeleaf in your favourite tools, using your favourite web-development framework. Check out our Ecosystem to see more integrati
www.thymeleaf.org
- Template View 만들기
- Thymeleaf를 사용하기 위해서는 아래 부분을 추가해줘야 한다.
<html lang="en" xmlns:th="http:/www.thymeleaf.org">- 동작 환경
Thymeleaf 기본 문법
<div th:[속성]="서버에서 받는 값 및 조건식" />- html 태그 안에서 문법을 추가한다.
- 이때, 태그는 div뿐만이 아니라 html에서 지원하는 태그들 모두 사용 가능하다.
th:text
- 태그 안의 텍스트를 서버에서 전달받은 값에 따라 표현하고자 할 때 사용하는 문법
th:utext
- th:text와 유사
- 변수에서 받은 값에 html 태그가 있다면 태그값을 반영해서 표시해 준다.
th:value
- Element 들의 value 값을 지정할 때 사용된다.
th:with
- 변수 값을 지정해서 사용하고자 할 때 사용된다.
th:switch
- Switch-case 문을 이용할 때 사용되는 문법
- th:case에서 case문을 다루고, *로 case문에서 다루지 않는 모든 경우가 처리된다.(*는 일반 문법에서의 default)

th:if
- 조건문이 필요할 때 사용되는 문법
- Else 문이 필요한 경우에는 th:unless를 사용한다.
- th:unless에 if에 적은 조건을 적어줘야 if가 아닌 경우를 인식할 수 있다.
th:each
- 반복문이 필요한 경우에 사용되는 문법
- 리스트와 같은 collection 자료형을 서버에서 넘겨주면 그에 맞춰 반복적인 작업이 이루어질 때 사용한다.
예시 코드
- Hellocontroller.java (서버쪽)
package codingon.kdt.kdt8.controller; import org.springframework.ui.Model; import org.springframework.stereotype.Controller; import org.springframework.web.bind.annotation.GetMapping; import java.util.ArrayList; import java.util.Arrays; @Controller public class HelloController { @GetMapping("/") public String getHello(Model model){ model.addAttribute("msg","<strong>Hello</strong>"); model.addAttribute("name","kim"); ArrayList<String> coffee = new ArrayList<>(); coffee.add("americano"); coffee.add("americano"); coffee.add("americano"); coffee.add("americano"); model.addAttribute("coffee", coffee); return "hello"; } //컨트롤러에서 리턴에 글자를 입력하면 파일명을 찾게 된다. //즉, getmapping으로 URL 주소가 들어왔을 때 return에 있는 글자를 templates에 있는 파일에서 찾아서 불러온다. //읽어오는 우선순위: templates => static 순으로 읽어온다. (return된 글자명의 파일을 찾는 순서) @GetMapping("/hello") public String getHello2(){ return "hello"; } }- hello.html
<!DOCTYPE html>
<html lang="en" xmlns:th="http:/www.thymeleaf.org">
<head>
    <meta charset="UTF-8">
    <title>Title</title>
</head>
<body>
<p th:text="'안녕하세요'+${msg}">안녕하세요</p> <!--text는 글자로 다 받아온다.-->
<p th:utext="'안녕하세요'+${msg}">안녕하세요</p><!-- utext는 태그를 인식해서 불러온다.-->

<input th:value="${msg}"/>
<!--안녕하세요 hello-->

<p th:with="abc=${msg}" th:utext="${abc}"></p> <!--변수 변경-->

<!--switch - case-->
<div th:switch="${name}">
    <p th:case="kim">kim</p>
    <p th:case="lee">lee</p>
    <p th:case="*">아무것도 아님</p>
</div>

<!--if unless (if~else) 위 아래 조건문이 같아야 한다.-->
<p th:if="${name}=='kim'" th:text="${name}"></p>
<p th:unless="${name}=='kim'">kim이 아님</p>

<!--반복문 th:each-->
<ul>
    <li th:each="c:${coffee}" th:text="${c}"/>
</ul>

</body>
</html>
실습
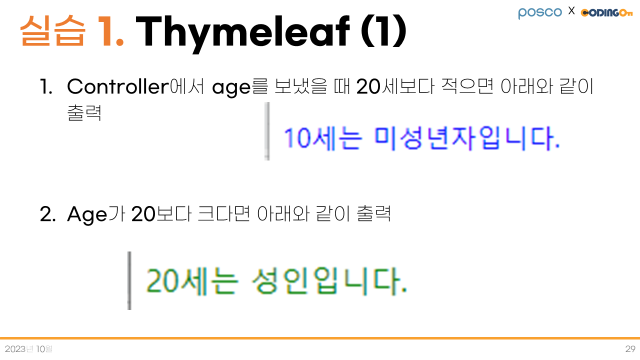
package codingon.kdt.kdt8.controller;

import org.springframework.ui.Model;
import org.springframework.stereotype.Controller;
import org.springframework.web.bind.annotation.GetMapping;

@Controller

public class HelloController {
    @GetMapping("/")
    public String getHello(Model model){

        model.addAttribute("age","10");
        return "hello";
    }
}
<!DOCTYPE html> <html lang="en" xmlns:th="http:/www.thymeleaf.org"> <head> <meta charset="UTF-8"> <title>Title</title> </head> <body> <!--실습1--> <p th:if="${age}<20" th:text="${age}+'세는 미성년자입니다.'"></p> <p th:unless="${age}<20" th:text="${age}+'세는 성인입니다.'"></p> </body> </html>

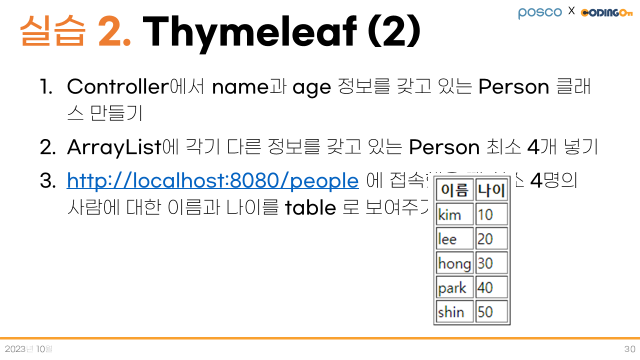
package codingon.kdt.kdt8.controller;

import org.springframework.ui.Model;
import org.springframework.stereotype.Controller;
import org.springframework.web.bind.annotation.GetMapping;

import java.util.ArrayList;
import java.util.Arrays;

@Controller

public class HelloController {
    @GetMapping("/people")
    public  String People(Model model){

        // ArrayList > String[]
        ArrayList<String[]> people = new ArrayList<String[]>();

        people.add(new String[]{"kim", "10"});
        people.add(new String[]{"lee","20"});
        people.add(new String[]{"hong","30"});
        people.add(new String[]{"park","40"});
        people.add(new String[]{"shin","50"});

        model.addAttribute("people",people);

        return "poeple";
    }

}
<!DOCTYPE html> <html lang="en" xmlns:th="http:/www.thymeleaf.org"> <head> <meta charset="UTF-8"> <title>Title</title> </head> <body> <!--실습2--> <table border="1"> <tr> <th>이름</th> <th>나이</th> </tr> <tr th:each="person : ${people}"> <td th:text="${person[0]}"></td> <td th:text="${person[1]}"></td> </tr> </table> </body> </html> 728x90
'[포스코x코딩온] 웹개발자 풀스택 부트캠프8기' 카테고리의 다른 글
[포스코x코딩온] REST, RESTAPI, DTO, VO (SpringBoot) (0) 2023.10.31 [포스코x코딩온] Spring Boot (Bean, Annotation) (0) 2023.10.30 [포스코x코딩온] Java (Wrapper 클래스, 오토박싱과 오토언박싱, 제네릭, 와일드 카드, 컬렉션) (0) 2023.10.26 [포스코x코딩온] Java(인터페이스, 다형성) (1) 2023.10.25 [포스코x코딩온] Java(클래스의 상속, 오버라이딩, 추상 메소드, 추상 클래스) (1) 2023.10.25